WYSIWYG Content Area

User level: Site Owner; Site Administrator; Site Editor; Site Author


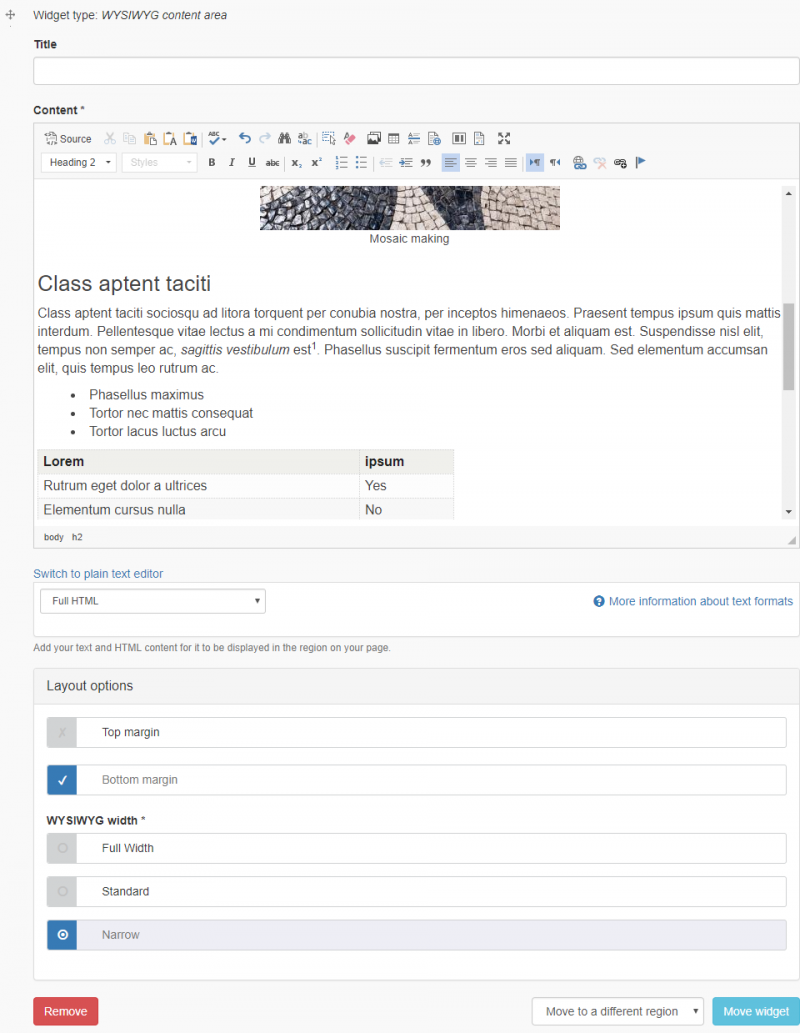
The What-You-See-Is-What-You-Get, or WYSIWYG, rich text editor displays content in a representation of the formatting that will appear on the rendered page.

wysiwyg text editor

Expand All

Text can be formatted using the options in the toolbar.

toolbar formatting options

Paragraph format

The paragraph format options can be used to change the formatting of selected blocks of text.
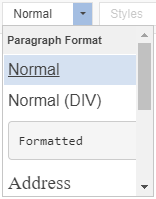
paragraph format options


Normal The default format for text written in the editor is 'Normal'. 'Normal' text will be output on the rendered page as body text, using HTML <p> tags.
Normal (DIV)
Text placed within <div> tags, instead of <p> tags.
Formatted
Text formatted using <pre> tags
Address
Text formatted using <address> tags
Heading 2

Text formatted using <h2> tags

Heading 3

Text formatted using <h3> tags

Heading 4

Text formatted using <h4> tags

Heading 5
Text formatted using <h5> tags
Heading 6
Text formatted using <h6> tags

Link style

Hyperlinks are formatted as underlined text by default. There are also four preset button and Call-to-Action styles [Button (fill); Button (outline); Call to action (fill); Call to action (outline)], which can be applied using the option in the Link style dropdown list.

Color and font settings for the button and Call-to-Action styles can be configured in:

Link styled as a Button

Output on a Mosaic site: Link styled as a Button
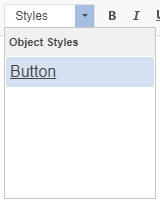
 

link formatting

To style a link as a button:

  • highlight the link text
  • select the 'Button' option from the Styles dropdown list

List style

Numbered and bulleted lists can be created using the List options in the toolbar.

list options toolbar

Numbered and bullet list options in the WYSIWYG toolbar

Standard and additional styles exist for numbered and bullet lists.

Numbered list styles

Standard numbered list

Spacing between list items is the same as the spacing in the 'Single-spaced list' style:

  1. Item one
  2. Item two
  3. Item three

Double-spaced list

Increased vertical space between list items:

  1. Item one
  2. Item two
  3. Item three

One-column circle numbered list

  1. Item one
  2. Item two
  3. Item three

Two-column circle numbered list

  1. Item one
  2. Item two
  3. Item three
  4. Item four

Bullet list styles

Standard bullet list

Spacing between list items is the same as the spacing in the 'Single-spaced list' style:

  • List item
  • List item
  • List item

Horizontal bulletless list

List items are displayed horizontally on desktop viewport sizes, and displayed in a vertical list on mobile viewport sizes:

  • List item
  • List item
  • List item

Double-spaced list

Increased vertical space between list items:

  • List item
  • List item
  • List item

Link list styles

Intended for displaying a list of links. There are four variations of this list style (one-column; two-column; three-column; four-column). Each list item includes a right-pointing chevron, e.g.:

Bulletless list styles

There are four variations of this list style (1-column; 2-column; 3-column; 4-column). By default, each list item does not have a bullet-point, e.g.:

  • List item
  • List item
  • List item
  • List item

It is possible to add Font Awesome Icons to the list items in this list style, e.g: 

  •  List item
  •  List item
  •  List item

Font and paragraph style

Font and paragraph styles can be applied using the options in the toolbar or shortcuts.

Font and paragraph style
  • Bold (Shortcut: Ctrl + B)
  • Italic (Ctrl + I)
  • Underline (Ctrl + U)
  • Strikethrough
  • Subscript
  • Superscript
  • Numbered list (see List style section above)
  • Bullet-pointed list (see List style section above)
  • Decrease indent
  • Increase indent
  • Blockquote
  • Text alignment (Left; Centre; Right; Justify)

Links and anchors can be created, edited and removed using the link options in the toolbar.

link tools

Recommended for links to external URLs and email addresses.

Link tool

Create a link to an external URL

  • Highligh the text that will become a link
  • Click on the Link option
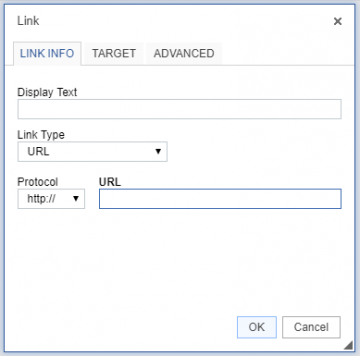
  • The Link modal opens. The Display Text field will contain the highlighted text.
    Link modal
  • Paste the destination URL into the URL input field. The Protocol dropdown list will automatically select the correct option.
  • Click OK

To add a link to an image, you need to right-click the image and 'Edit this item':

  • Uncheck the box 'For decoration only' if it has previously been selected
  • Add the URL to the 'Link to URL' field
  • Embed

Create a link to an email address

  • Highlight the text that will become a link to an email address
  • Click on the Link option
  • The Link modal opens. The Display Text field will contain the highlighted text
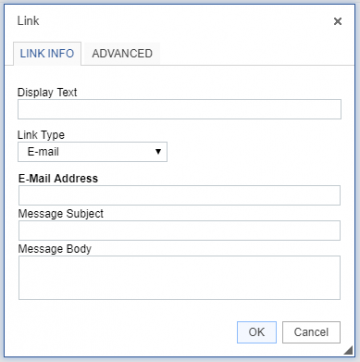
  • Under Link Type, select E-mail
  • Input the destination email address in the E-Mail Address field
    Link modal email configuration
  • A message subject and body text can be added, if required
  • Click OK

Recommended for creating links to pages and files on the site.

Link to content (Linkit) tool

Create a link to content (page or file) on the website

  • Highlight the text that will become a link to content
  • Click on the Link to content option (or use the shortcut Ctrl + L)
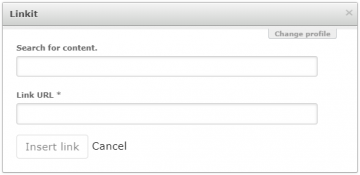
  • The Linkit modal opens
    Link to content (Linkit) modal
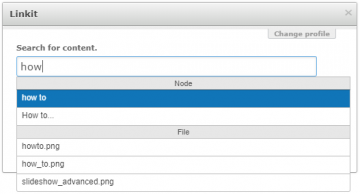
  • Type the first characters of the page title or file name that will be linked to into the Search for content field
  • Search results of pages and files matching the text input will be displayed
    Link to content (Linkit) example
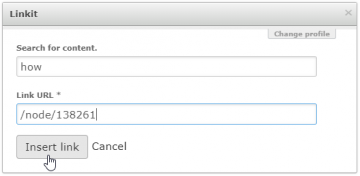
  • Select the page/file to be linked to. This will be displayed in format /node/[node ID]
    Link to content (Linkit) example
  • Click Insert link

Anchors enable browsers to locate specific pieces of content. Anchors can be inserted into text using the Anchor option in the toolbar.

Anchor tool

Create an anchor

  • Place the cursor where the anchor should appear
  • Click the Anchor option
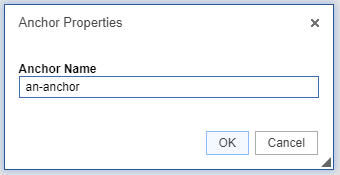
  • The Anchor Properties modal opens
  • Input an anchor name (without spaces) in the text field
    Anchor modal example
  • Click OK

An anchor flag will now be visible in the text editor.

Anchor flag in text

Output in the text editor: Anchor flag visible

Edit or delete an anchor

To edit or delete an anchor:

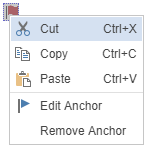
  • right click on the anchor flag
  • select 'Edit Anchor' from the menu
    Anchor edit options

Use a widget's ID

You can use a widget's ID instead of creating a custom anchor. To locate a widget's ID:

  • enter page edit mode or Quickedit
  • go to the widget you want to link to (in Quickedit mode open the widget for editing)
  • note the widget ID in the blue field in the top-right of the widget editing area (1)
    widget anchor link id

Create a jump link

Using Link

To link to an anchor using the Link tool:

  • Highlight the text that will become a link
  • Click on the Link option
  • The Link modal opens. The Display Text field will contain the highlighted text
  • Under Link Type, select Link to anchor in the text
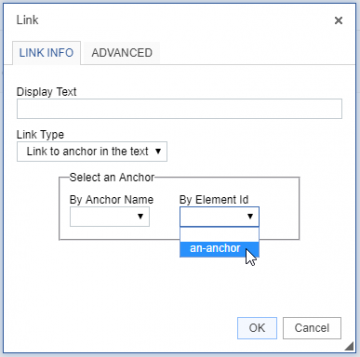
  • In the Select an Anchor region, select the anchor from the By Element Id dropdown list
    Link modal anchor selection
  • Click OK

Using Linkit

Anchor in different widget but on the same page as the link

To use Linkit to link to an anchor on the same page:

  • Highlight the text that will become a link to content
  • Click on the Link to content option (or use the shortcut Ctrl + L)
  • The Linkit modal opens
    Link to content (Linkit) modal
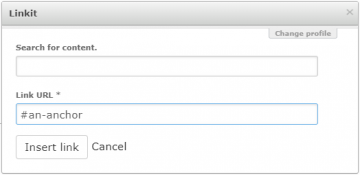
  • In the Link URL field, enter the anchor ID (i.e. '#', followed by the anchor name or use the widget ID)
    Entering an anchor ID into the Link URL field in the Linkit modal
  • Click Insert link

Anchor on another page

To use Linkit to link to an anchor on another page:

  • Highlight the text that will become a link to content
  • Click on the Link to content option (or use the shortcut Ctrl + L)
  • The Linkit modal opens
    Link to content (Linkit) modal
  • Type the first characters of the page title the anchor appears on into the Search for content field
  • Search results of pages and files matching the text input will be displayed
    Link to content (Linkit) example
  • Select the page to be linked to. This will be displayed in format /node/[node ID]
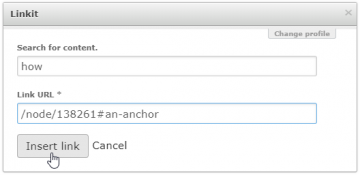
  • Manually append the anchor ID (i.e. '#', followed by the anchor name or use the widget ID) to the Link URL, e.g.:
    Linkit example of appending anchor ID
  • Click Insert link

To remove a link:

  • highlight the link
  • click the Unlink option. The link will revert to normal text.
    unlink tool

The Remove Format option in the toolbar removes font styling from selected text.

remove format tool

Shortcut: Ctrl + space

The following formatting is removed when Remove Format is used:

  • Bold
  • Italic
  • Underline
  • Strikethrough
  • Subscript
  • Superscript
  • Decrease indent
  • Increase indent
  • Text alignment (Centre; Right; Justify)
  • style attributes applied to HTML elements
  • classes applied to HTML elements
  • inline styles applied using <span> tags
  • Button style applied to hyperlinks

Select All

To remove formatting from all text content in the WYSIWYG, first click the Select All option in the toolbar, then click Remove Format.

Select All tool

Shortcut: Ctrl + A

Copy and Cut content

Use either the Copy and Cut tools in the WYSIWYG or use keyboard shortcuts:

  • Copy (Shortcut: Ctrl + C)
  • Cut (Ctrl + X)

Paste content

Pasting content into the WYSIWYG text editor requires keyboard shortcuts to be used:

  • Paste (Ctrl + V)
  • Paste as plain text (Ctrl + Shift + V)

Remove source styling from copied text

When text content is copied from a webpage or document, the text styles and formatting of the source content are also copied to the clipboard. If Paste (Ctrl + V) is used transfer copied text, the source styles and formatting are transferred to the WYSIWYG text editor. When this happens, these styles take precendence over the site's font settings (Font Management).

It is considered best practice to remove source styles from copied text when it is pasted into the text editor.

There are two methods to achieve this:

Paste as plain text

  • Copy the text from the source webpage or document
  • Go to the WYSIWYG text editor
  • Paste the text into the text editor using Ctrl + Shift + V

The text content will be pasted into in the WYSIWYG text editor but all styling and HTML markup will be removed (i.e. all text will be formatted as Normal text).

Paste, then remove styling and maintain document structure

  • Copy the text from the source webpage or document
  • Go to the WYSIWYG text editor
  • Paste the text into the text editor using Ctrl + V
  • Highlight all of the text content using the Select All option in the toolbar or Ctrl + A
  • Click the Remove Format option in the toolbar

This will remove all text styling but maintain the document's structure, i.e. the following document features will be maintained:

  • headings
  • body text
  • bullet lists
  • numbered lists
  • anchor tags (e.g. hyperlinks)

Images and files can be embedded on pages using the WYSIWYG text editor.

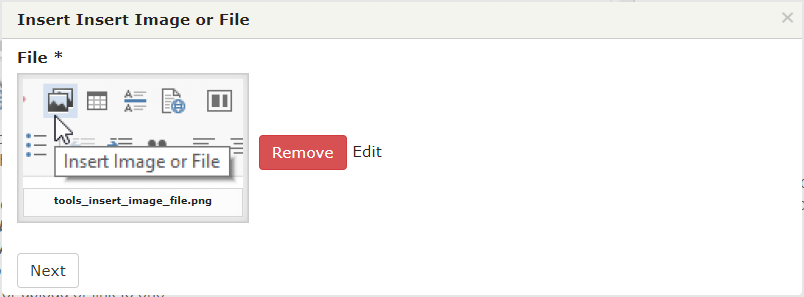
Insert Image or File tool

Embed an image or link to a file

  • Click the Insert Image or File tool
  • Insert Image or File modal opens:
    Insert image file browse modal
  • Click on the 'Browse' link
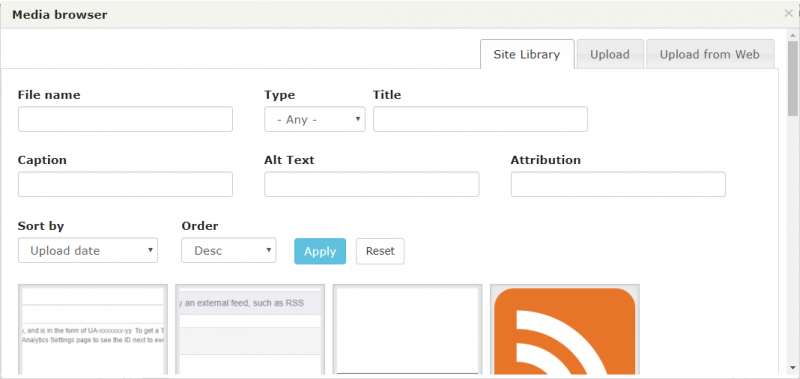
  • The Media browser opens:
    Media browser
  • Choose image source:
    • Site Library: the site's image and file store
    • Upload: upload an image or file from a local source (e.g. from your computer's hard drive). Once uploaded, the image or file will be in the site's file store
    • Upload from Web: enter a URL to a file or media resource. Images and files will be copied to your site, embedded media will be embedded and pointed to on the source server. NB This method currently supports the embedding of content from the following media providers: Youtube, Deviantart, Facebook Post, Facebook Video, Flickr, Hulu, IFTTT, Instagram, Podbean, Revision3, Scribd, SlideShare, SmugMug, SoundCloud, Spotify, TED, Twitter, Ustream, Viddler, Vimeo.
  • Select image or file, or upload one
  • The Insert Image or File modal reloads, displaying the image or file preview:
    Insert image file preview modal
  • Click 'Next'
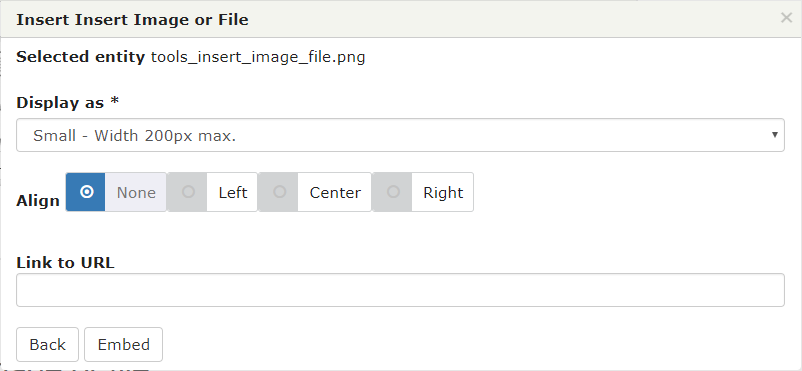
  • The display options load:
    Image or file display options
  • Add Link to URL as required (note not possible for images used for decoration only)
  • For images, select a size option and alignment within the WYSIWYG, click 'Embed'
  • For files, click 'Embed'

Remove an image or file link from a page

  • In the WYSIWYG, double-click on the image or file link
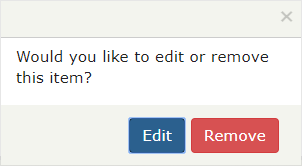
  • The a modal opens displaying options to edit or remove the item:
    Edit remove item modal
  • Click 'Remove'

Update an image or file

The images and files in the site's file store can be updated independently to the embedded image or file link items in the text editor.

To update an image or file:

  • Go to the file store (Manage Content > Files)
  • Locate the image/file to be updated
  • Enter the image/file's edit mode
  • Use the 'Replace file' option to select a new file (from local storage) to replace the current file with
  • After saving this change, embedded items referencing this image or file will now display the new image/file

To update the file preview text (i.e. the link text for a document):

  • Go to the file store (Manage Content > Files)
  • Locate the file to be updated
  • Enter the file's edit mode
  • Update the Name field
  • After saving this change, embedded file links referencing this file will now display the updated text

Third-party content can be embedded into a WYSIWYG using three methods:

Embed using the 'Upload from Web' option in the 'Media browser'

This is the recommended method and details are provided in the section on Inserting Images and Links to files.

Embed using the iframe tool

Screen shot of WYSIWYG text editor with iFrame button highlighted


Content services which make media available for embedding in iframes typically provide URLs for embedding content within iframes. There is an iframe tool in the 'Full HTML' toolbar to embed iframes using these URLs into the text editor.

Note: an embed URL is not the URL for the page the content is currently embedded on; the embed URL refers directly to the piece of content. Embed URLs must use https in order for the content to display on the page; see the Oxford Mosaic website for more information about https use on Mosaic.

To use the iframe tool to embed content:

  • Place the cursor where the iframe should be inserted
  • Click on the iframe tool
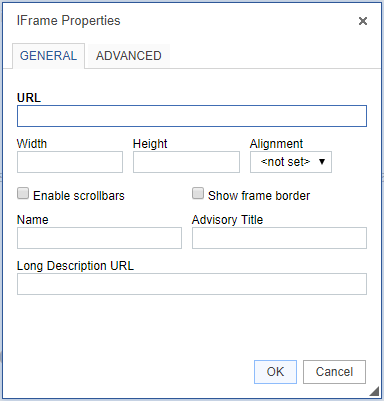
  • The iFrame Properties modal opens:
    iframe properties modal
  • In the URL field, enter the URL for the content being embedded. Note: this is not the URL for the page the content is currently embedded on; the embed URL refers directly to the piece of content. Content providers which make media available for embedding in iframes typically provide embed URLs. Embed URLs must use https in order for the content to display on the page; see the Oxford Mosaic website for more information about https use on Mosaic.
  • Specify Width and Height parameters in pixels. 
  • The remaining settings are optional
  • Click 'OK'. The iframe will be represented in the WYSIWYG editing view by a blank panel labelled 'IFRAME'. When the edits are saved, the embedded content will be visible when viewing the page.

Embed using an iframe in the 'Source' view

If you have copied an embed code snippet (within <iframe> HTML tags) from a content provider, you can insert the snippet in your WYSIWYG using the text editor's Source view. For example, you can copy an embed code from a public post, reel or profile in Instagram. To use the code in your WYSIWYG, follow these steps:

  • Click Source in the toolbar
    source view tool
  • In Source view, locate the position in the document where the <iframe> snippet will be inserted
  • Paste the snippet using (Ctrl + V)
  • Either return to rich text view (by clicking Source), or save the page edits.


How do I change the size of embedded content?

  • Go to the source view of the text content area containing the embedded content
  • Locate the 'height' and 'width' attributes of the <iframe> HTML element 
  • Edit the height and width of the iframe as necessary. (W3Schools provides guidance on responsive iframes.) 


Column layouts v data tables

Confused about which to use? Text should be arranged using a column layout to support the use of screen readers. This is to comply with accessibility best practice. WebAIM provides detailed guidance on how to create accessible data tables.


Multi-column layouts can be inserted into the WYSIWYG editor. All content that can be inserted into the text editor can be displayed within a column. Column layouts utilise the Bootstrap Grid system, which ensures the columns behave responsively at different screen widths.

Insert a column layout

To insert a column layout into a WYSIWYG editor:

  • Place the cursor where the columns should be positioned
  • Click the Layouts option from the toolbar
    column layouts tool
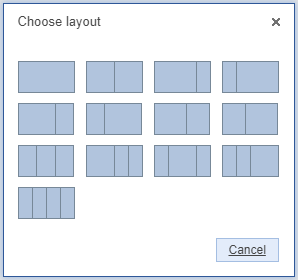
  • The Choose layout modal opens:
    choose layout modal
  • Select the preferred layout
  • The column structure will be visible in the text editor. Column layouts occupy the full width of the WYSIWYG widget. Because the structure is responsive, it may display as rows rather than columns depending on the breakpoint of your screen. Using the maximise button to view the structure full size will show side-by-side columns:
    column layouts inserted into the text editor

Add content to a column

To add content to a column within the layout:

  • Place the cursor within the inner region of one of the columns
  • Insert content as usual

Edit a column layout

To edit a column layout:

  • Click 'edit' in the options above the inserted layout
  • The Choose layout modal opens
  • Select a new preferred layout

Remove a column layout

To remove a column layout:

  • Click 'remove' in the options above the inserted layout
  • The layout and all content within it will be removed from the text editor

WYSIWYG text can be set to one of three width settings on the rendered page:

  • Full width
  • Standard
  • Narrow

See WYSIWYG examples in the Mosaic Pattern Book for more information.

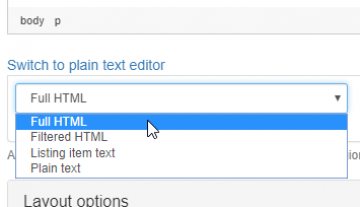
The toolbar can exist in four different configurations, ranging from all editing tools being visible to a restricted number of editing tools; and a plain text version of the editor with no toolbar. The toolbar configuration that is visible to a user depends on the HTML settings of the WYSIWYG.

html settings

Full HTML*

All editing tools are available to the user.

Full HTML editing options

Filtered HTML

A subset of the editing tools is available to the user. A number of options are not displayed to the user, including the HTML source view.

filtered HTML editing options

Listing item text

The listing item text setting provides the editing options available to users in some of the content editing text input areas, for example, the lising text input and banner text input fields.

Listing item text editing options

Plain text*

Plain text formatting removes the toolbar and provides the option of inputting HTML as plain text.

Plain text formatting


*SSO profile editors are unable to edit WYSIWYGs whose HTML settings have been set to 'Full HTML' or 'Plain text'. A Site Owner or Site Administrator will need to edit the SSO editor's profile page to change the WYSIWYG HTML settings to 'Filtered HTML' or 'Listing item text' before the SSO editor can edit text in the WYSIWYGs on their page.

wysiwyg widget