Page Settings

User level: Site Owner; Site Administrator


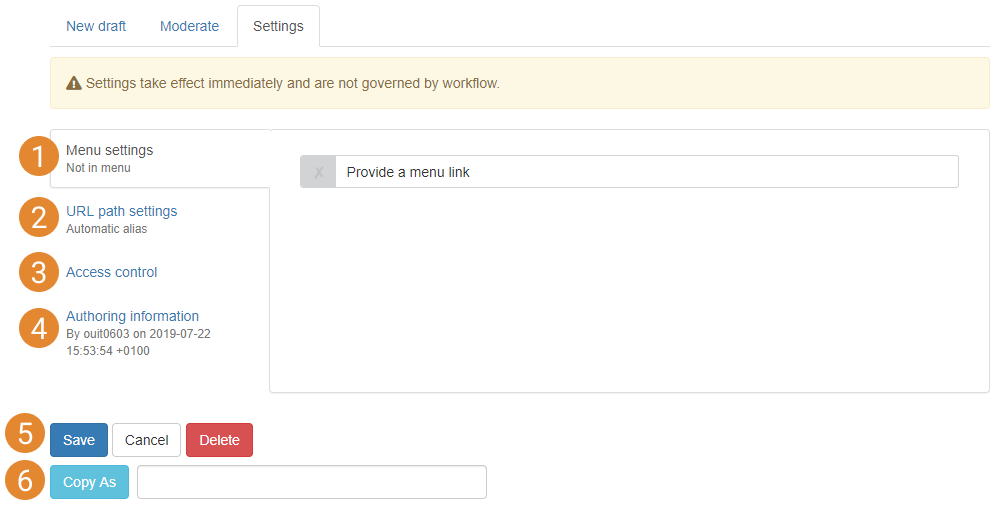
From the 'Settings' tab of the 'Edit Page' interface you can create a menu link for the page, edit the page's URL aliases, set access restriction, see who authored the page, delete the page, and create a new page by copying the one you're viewing.

page settings labelled

Expand All

Create a menu link

The recommended way to create a page link is to first create the page you want to link to. Once the page is created, create the menu link for it. It is best to create the menu link from within the page's Settings:

  • Enter the page edit mode
  • Go to the Settings tab
  • Go to the Menu settings tab
  • Check the 'Provide a menu link' checkbox
  • Choose the appropriate 'parent item' set the link's position in the menu hierarchy
  • Click 'Save'

When the page reloads, a link for the page will be in the menu structure. If you have set the page's menu link to appear at the second-level of the menu hierarchy or lower and you can't see the link in the menu, this may be because the style of menu only displays menu levels which are above the level of the page's link. See Navigation documentation for more information

Automatic page alias creation

URL aliases for pages are created automatically when the page is created. To automatically generate the page alias, the page's title is converted into an alias, e.g.:

  • For a page entitled 'Contact us', an alias of 'contact-us' is created.

Note that the automatic alias generation replaces spaces between words in the page title with hyphens '-', and common words such as 'of' and 'the' are omitted, e.g.:

  • For a page entitled 'About the Centre', an alias of 'about-centre' is created.

Create custom page aliases

You can add custom aliases to pages. To do this:

  • Uncheck the 'Generate automatic URL alias' checkbox
  • Overwrite the alias in the 'URL alias' input field with your new alias. Note: this will not remove the current alias(es) from the page
  • Click 'Save'

When the page Settings screen reloads, the new alias will appear in a list of aliases on the URL path settings tab.

Check which alias is set as the primary one

To check which alias has been set as the primary alias:

  • Re-enter edit mode, navigate back to the Settings tab > URL path settings
  • There will be more than one alias, each with a radio button on the left. The radio button of the primary alias is blue.
  • To select a different primary alias, click the appropriate radio button and click Save


*This tab will display if SSO-only content restriction is enabled on the site. See Visibility documentation for more information.

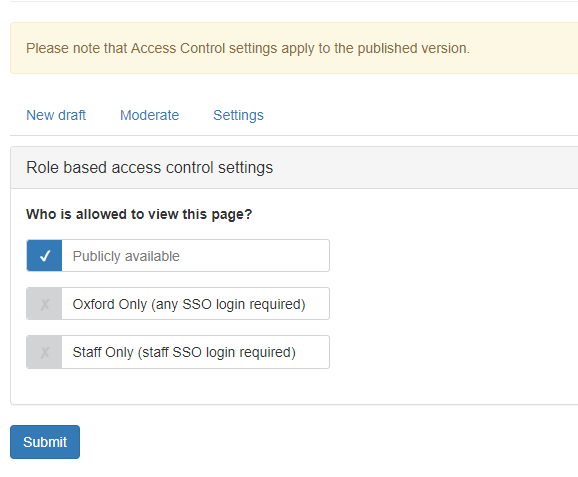
The 'Set access control' button takes you to the Role based access control settings screen (below)

Screenshot of options for Role based access control settings

Access control settings screen

This allows you to restrict access to a page to 'Oxford Only' (anyone with an Oxford SSO can log in to view the content) or 'Staff Only' (you must have an Oxford staff SSO to view the content), if you have these options enabled for your site. To check if these options are enabled, and to request them if they are not, go to Site Settings > Visibility. 

Information about the original author of the page.

  • 'Authored by' displays the author's SSO ID
  • 'Authored on' displayed the date and time the page was created
  • 'Save' button: when clicked, the information on the page Settings screen is saved and the Settings screen reloads
  • 'Cancel' button: when clicked, the content view of the page is displayed. Any changes made to the Settings screen are not saved
  • 'Delete' button: when clicked, a confirmation message ('Are you sure you want to delete [page title]?') is displayed
    • Clicking 'Delete' on the confirmation message permanently deletes the page; the browser reloads on the site's homepage
    • The Mosaic Team cannot restore a deleted page. Depending when the page was created, you may find a version of it on your test- or demo- site (test-[site prefix].web.ox.ac.uk). It depends when these environments were last cloned. Sharing and copying content to your live site wouldn't be possible, but you would be able to copy and paste text to save you some time when recreating the page
    • Clicking 'Cancel' on the confirmation message reloads the Settings screen

To create a copy of the current page:

  • View the 'Copy this page' section at the bottom of the Settings screen
  • Enter a title for the new page into the 'Title of copy' textfield
  • Click 'Create copy' button
  • The browser will reload on the page editing screen of the newly-created page

If the original page includes an image on the Details tab, the copied page will display the same image. The copying process does not create another instance of the image in the site library. This means any changes made to the image on the copied page will affect all instances where the image is used. For example, if you copy a People page. To update the image on a copied page:

  • Use the Remove button next to the image on the Details tab of the copied page.
  • Browse for a new image and save the copied page.

This will enable you to upload a different profile image for each person.